
In the last post, we described three different use cases for custom DNS entries in Kubernetes:
- Making an alias for an external name
- Dynamically adding services to another domain, without running another server
- Adding an arbitrary entry inside the cluster domain
In that post we covered the first two. In this post, we’ll show you how to use the fallthrough option of the kubernetes
plugin to satisfy the third case.
To understand how this works, we first need to look at how CoreDNS processes requests. This was previously addressed in Query Routing, but we’ll go into a bit more detail here.
We all know that CoreDNS chains plugins. But what exactly does that mean? To find out, we’ll dissect a Corefile and see how that translates into CoreDNS internals, and discuss how a query is routed through these internals.
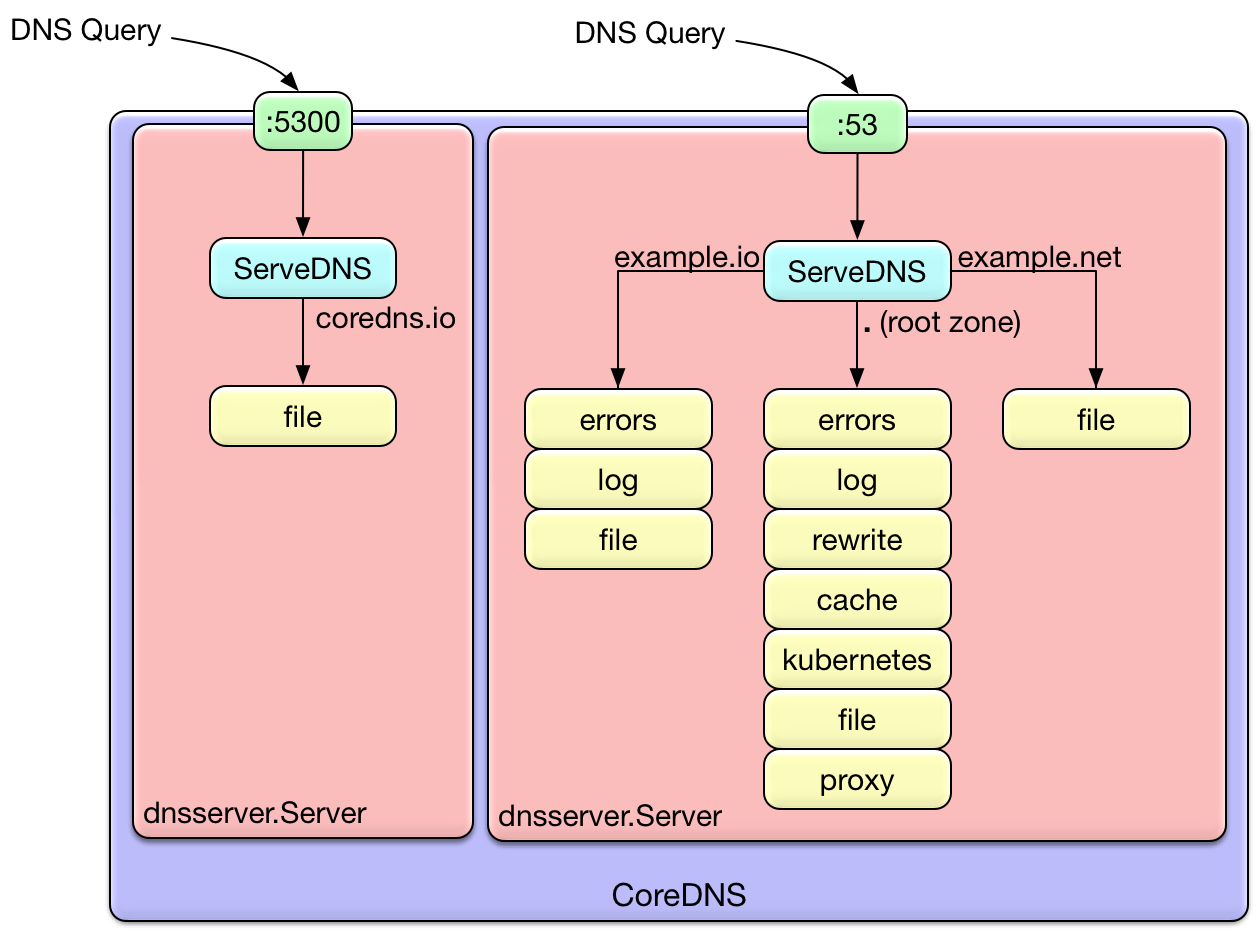
Consider this Corefile:
coredns.io:5300 {
  file /etc/coredns/zones/coredns.io.db
}

example.io:53 {
  errors
  log
  file /etc/coredns/zones/example.io.db
}

example.net:53 {
  file /etc/coredns/zones/example.net.db
}

.:53 {
  errors
  log
  health
  rewrite name foo.example.com foo.default.svc.cluster.local
  kubernetes cluster.local 10.0.0.0/24
  file /etc/coredns/example.db example.org
  forward . /etc/resolv.conf
  cache 30
}
Notice here that there are two different ports: 5300 and 53. Internally, each of these ports will
result in a dnsserver.Server.
Even though there are four server blocks (stanzas), we only get two actual servers. CoreDNS will gather up all of the
server blocks associated with the same port and combine them in to the same dnsserver.Server. The server will
multiplex the queries on the port, passing them to the different plugin chains depending upon the zone. It chooses
the most specific matching server block for the zone. If no server block matches, SERVFAIL is returned. This is shown
visually in the diagram below.
So, any specific query will go through exactly one plugin chain. The ordering of the plugin is dictated
at build time, by the plugin.cfg file,
although there is some discussion about making this modifiable
at runtime. This is why even though cache appears at the end of the server block, it is not the end of the
plugin chain.
Notice in the .:53 server block, we define the health plugin, but it doesn’t appear in the diagram. This is
because there are a few different types of plugin. “Normal” plugin perform request handling, and appear in the
plugin chain. However, there are a few plugin that just modify the configuration of the server or server block.
Since they don’t have any request-time logic, they are not inserted in the plugin chain. Some plugin that work
this way are the health, tls, startup, shutdown, and root plugin.
You can divide the plugin that do perform request-time processing into two groups: plugin that
manipulate the request in some way, and backend plugin. Backend plugin provide different sources
of zone and record data. The etcd, file, and kubernetes plugin are all examples of backends.
Plugin that manipulate the request but are not backends - that is, they are not a source of zone data - generally
will pass the query to the next plugin after performing their logic. For example, the rewrite plugin makes
a change to the request, and then passes it on. When the result is returned from the later plugin, it reverts the
question section to the original (so that clients don’t complain), but keeps the response and passes it back to the client.
Any given backend is usually the final word for its zone - it either returns a result, or it returns NXDOMAIN for the
query. However, occasionally this is not the desired behavior, so some of the plugin support a fallthrough option.
When fallthrough is enabled, instead of returning NXDOMAIN when a record is not found, the plugin will pass the
request down the chain. A backend further down the chain then has the opportunity to handle the request.
Coming back to our original discussion of the three use cases in Kubernetes, we can now understand how we can use
fallthrough to meet the third use case. Remember the initial Corefile from that blog:
.:53 {
    errors
    log
    health
    kubernetes cluster.local 10.0.0.0/24
    forward . /etc/resolv.conf
    cache 30
}
This handles the standard in-cluster DNS service discovery. The third use case is to add an arbitrary entry to the existing
cluster domain. To do this, we define another backend for handling the cluster.local zone, and configure the fallthrough
option in the kubernetes plugin. For very dynamic entries, we could use the etcd plugin. But for demonstration
purposes it’s simpler to use the file plugin, so that is what we will do.
Since kubernetes comes before file in plugin.cfg,
using fallthrough in kubernetes will result in file handling any queries that kubernetes does not. This means that we
need to have a zone file as part of our ConfigMap, just like we did to handle the second use case in the previous blog. In this case, though, instead of being configured with a different zone (example.org in the other blog), the file plugin is
configured to use the cluster.local domain:
apiVersion: v1
kind: ConfigMap
metadata:
  name: coredns
  namespace: kube-system
data:
  Corefile: |
    .:53 {
        errors
        log
        health
        kubernetes cluster.local 10.0.0.0/24 {
          fallthrough
        }
        file /etc/coredns/cluster.db cluster.local
        forward . /etc/resolv.conf
        cache 30
    }
  cluster.db: |
    cluster.local.               IN      SOA     ns.dns.cluster.local. hostmaster.cluster.local. 2015082541 7200 3600 1209600 3600
    something.cluster.local.     IN      A       10.0.0.1
    otherthing.cluster.local.    IN      CNAME   google.com.
Remember to add the cluster.db file to the config-volume for the pod template:
      volumes:
        - name: config-volume
          configMap:
            name: coredns
            items:
            - key: Corefile
              path: Corefile
            - key: cluster.db
              path: cluster.db
and finally to signal CoreDNS to gracefully reload (each pod running):
$ kubectl -n kube-system exec coredns-461002909-7mp96 -- kill -SIGUSR1 1
Now let’s try out our new DNS records.
$ kubectl run -it --rm --restart=Never --image=infoblox/dnstools:latest dnstools
If you don't see a command prompt, try pressing enter.
/ # host kubernetes
kubernetes.default.svc.cluster.local has address 10.0.0.1
/ # host something
something.cluster.local has address 10.0.0.1
/ # host otherthign
Host otherthign not found: 3(NXDOMAIN)
/ # host otherthing
otherthing.cluster.local is an alias for google.com.
google.com has IPv6 address 2607:f8b0:4005:805::200e
google.com mail is handled by 30 alt2.aspmx.l.google.com.
google.com mail is handled by 50 alt4.aspmx.l.google.com.
google.com mail is handled by 40 alt3.aspmx.l.google.com.
google.com mail is handled by 20 alt1.aspmx.l.google.com.
google.com mail is handled by 10 aspmx.l.google.com.
/ #
We can see if we put in an incorrect name, we still get NXDOMAIN as you would expect. However, a correct name will resolve to the record from our zone file. So, we now have a way to create custom entries in the cluster domain.
In the standard CoreDNS release, the kubernetes plugin comes before file and etcd. This means that it gets the
first chance to handle the query. You can rebuild CoreDNS to change that ordering if you wish - take a look at
Miek’s post on How to Add Plugins to CoreDNS
if you want to see how that’s done.